Try Weglot for free


Shopify language switcher is a useful native feature for multilingual stores. The device allows customers to view your site in their preferred language, enabling your brand to tap into new international markets. You can also customize the feature by using code, so it’s more in line with your brand’s aesthetic.
However, the native feature does have its drawbacks, including limited customizations when compared to third-party solutions.
By integrating a dedicated Shopify translation app, store owners can benefit from additional features that improve functionality, boost user engagement and take care of the actual translation part. For example, our own Shopify translation app Weglot, offers unique design and placement options for its language switcher, making it adaptable to any store layout. Plus, it does so much more than just allow users to switch languages. But more on that later.
In this article, we’ll show you how to get the most from Shopify’s native language switcher before exploring Weglot on Shopify, detailing best practices for translating your store and providing an optimal user experience.

First up, let’s look at Shopify’s built-in language switcher. As we mentioned, this feature allows store owners to support multiple languages, so it naturally improves User Experience (UX) for international customers.
Both manual language selection and automatic language redirection based on visitors' browser preferences are supported. You can enable automatic language redirection based on visitors' browser preferences under Online Store > Preferences > Automatic redirection > Language, provided you've published the relevant languages and made them available in your target markets.
If the native switcher covers what you need, here’s how to set it up.
Before a language switcher even appears, your Shopify store needs to actually offer more than one language. If you’ve already set up your translations, feel free to jump ahead to the next section. Otherwise, here’s how to get started…
Head to Settings > Languages > Add language. Choose from over 20 supported options, with everything from Spanish to Japanese available. Remember, clicking Publish next to each language is needed to make translations live for customers. Miss this step and your new switcher won’t have anything to switch.
Shopify’s built-in Translate & Adapt app is one option for a multilingual store. It automatically translates your core content into 2 languages for free (8 if your store is based in the UK, Switzerland, or one of 10 EU countries), right from the Settings > Apps section after you’ve added your languages.
For bulk control, export your site’s language data as a CSV from Settings > Languages > Export. Edit translations in bulk, then re-import – the key is never to touch the Liquid code inside those curly {{ }} or {% %} brackets. That’s Shopify’s theme engine, not plain text.
If you prefer full manual control, Shopify lets stores manage up to 20 languages (30 on Shopify Plus). Look under Settings > Languages > Actions > Order translations to order professional translation services directly from your Shopify dashboard.
Once your languages are published and translations are applied, you’re ready to tackle the switcher.
Shopify's built-in language switcher is usually found in your theme editor, under the Header or Footer section. Its exact location and customization options depend on your theme and version.
Try the following steps:
Once your store has multiple published languages available in the customer's market, the switcher should display the available language options.
Shopify's free themes, including Dawn, Craft, Refresh, Sense, and Studio, support language selectors in both the header and footer in current versions. Free Online Store 2.0 themes from version 9.0.0 onward, as well as Horizon-family themes, support header placement without additional code.
For premium themes, placement options vary. For example, Impulse supports language selection in its header toolbar and footer, while other themes may provide different settings or locations. Check your theme developer's documentation if you can't find the option.
Older vintage themes may offer fewer customization options. If your theme doesn't support your preferred placement, you may need to edit its Liquid templates, switch to a newer theme, or use a translation app with its own placement controls.
The switcher's appearance also depends on your theme. Built-in selectors generally display language names and follow your store's fonts, colors, and styling. Some themes offer additional design settings, while more extensive customization may require CSS.
Also, check the mobile layout using Shopify's theme preview. Depending on your theme, the switcher may appear in the footer, header, or mobile navigation menu. Make sure customers can easily find and use it on smaller screens, and keep your country/region selector nearby if you're displaying both.
You can add a language selector to your Shopify header through your theme's built-in settings or use Weglot's Switcher Editor to position a customizable switcher without editing your theme code.
To add Shopify's native language selector, as explained earlier, go to Shopify Admin > Online Store > Themes > Edit theme, open the Header section, look for Enable language selector or a similar setting, enable the selector, then click Save.
If you're using Weglot, open Weglot Dashboard > Settings > Language Switcher > Switcher Editor. Drag the switcher into your preferred header location and click Save. Choose an area that appears consistently across your store's pages so the switcher stays in place as customers navigate.
For more precise positioning, Weglot also supports this HTML placeholder:
<div id="weglot_here"></div>
You can add it to a Custom Liquid section or block in your theme's Header area, if supported, or insert it into the appropriate theme file. Weglot then displays the switcher where the placeholder appears. The exact placement depends on your theme's layout.
After setup, always test the switcher on desktop and mobile, including product and collection pages. Also, test your checkout flow because Shopify manages checkout separately from your storefront header, so adding a switcher there doesn't automatically add one to checkout. If you're using Weglot's Shopify Markets integration, Shopify handles the checkout language based on the customer's earlier selection, and the Weglot switcher itself doesn't appear during checkout.
If your Shopify theme doesn't offer the language selector placement or design options you need, you can create a custom selector using Liquid. This requires editing your theme's code, so make a backup before proceeding.
To set up and customize the Shopify language switcher, you’ll need to follow these steps:
{% if localization.available_languages.size > 1 %}
  <div class="page-width custom-language-topbar">
    {% form 'localization', id: 'header-language-form' %}
      <div class="shopify-language-switcher">
        <label for="header-language-selector">Language</label>

        <select
          id="header-language-selector"
          name="language_code"
        >
          {% for language in localization.available_languages %}
            <option
              value="{{ language.iso_code }}"
              {% if language.iso_code == localization.language.iso_code %}selected{% endif %}
            >
              {{ language.endonym_name | escape }}
            </option>
          {% endfor %}
        </select>

        <button type="submit">Apply</button>
      </div>
    {% endform %}
  </div>
{% endif %}
The position of your Liquid code determines where the language switcher appears on your storefront. For example, placing it inside your header's navigation area may display it alongside your menu, while placing it in a separate container above the navigation can create a dedicated language selection bar.
This code uses Shopify's localization form to retrieve the languages available to customers. It displays each language by its native name, such as Français for French, and marks the current language as selected. Customers choose a language from the dropdown and click Apply to switch.
If your theme already displays a language selector in the same location, disable the existing one through the theme editor to avoid duplicates.
.custom-language-topbar {
  display: flex;
  justify-content: flex-end;
  padding-top: 8px;
  padding-bottom: 8px;
}

.custom-language-topbar .shopify-language-switcher {
  display: flex;
  align-items: center;
  justify-content: flex-end;
  gap: 8px;
  flex-wrap: wrap;
}

.shopify-language-switcher select {
  font: inherit;
  font-size: 16px;
  color: #007bff;
  background-color: #fff;
  border: 1px solid #ccc;
  border-radius: 5px;
  padding: 8px;
}

.shopify-language-switcher select:hover {
  border-color: #555;
}

.shopify-language-switcher select:focus-visible {
  outline: 2px solid #0056b3;
  outline-offset: 2px;
}

Weglot is an AI-powered website translation tool that adds a language switcher to your Shopify store without any edits to your theme. While the native Shopify language switcher is functional, dedicated Shopify translation apps like Weglot offer greater customizations, along with additional Shopify translation features for those looking to truly localize the store experience for their international customers.
Unlike the Shopify language switcher, Weglot automatically translates 100% of the site content from a choice of 110+ languages, including checkout pages, email notifications, and SEO metadata, optimizing it for search engines.

With Weglot, your entire Shopify store benefits from automatic translation, accelerating expansion projects. Compared to hiring individual translators for each language, Weglot’s automation significantly reduces the time to market for new language versions.
However, Weglot’s capabilities don’t stop at automated translation. With Weglot, you get complete editing control over the translated content on your site. You can also hire professional translators directly through the platform.
You can also instantly generate on-brand translations with Weglot's AI Translation Model. It learns from your instructions, glossary, and manual translation history to immediately give you context-aware translations that sound like you.
Weglot also integrates with Shopify’s existing features and popular third-party apps, including customization for themes like Dawn and Prestige. This eliminates the hassle of managing multiple stores or manual translations, as you can add, publish, unpublish, or delete languages as needed.
Weglot also takes care of more than just translation, with multilingual SEO benefits at the app’s core. The platform automatically creates subdomains or subdirectories for each language version and implements hreflang tags, optimizing your site for local search engines. Plus, our Visual Editor allows for easy customization of translations, enabling fine-tuning to match your brand’s voice.

Best of all, setting up Weglot and customizing your language switcher can be achieved in a matter of moments! Let’s take a look.

Setting up Weglot on your Shopify store is really straightforward. Here’s a guide to get you started:
1. Begin by visiting the Shopify App Store:
2. After installing the app, you’ll need to set up an account:
3. Configure your language settings:

After selecting your languages, Weglot will automatically scan all the content on your store, including metadata and content from third-party apps. Automatic detection means you won’t have to manually gather content for translation, as Weglot does it all for you!
Then, your site is instantly translated using leading AI translation and displayed under language subdirectories or subdomains, depending on the structure you’ve chosen in the Weglot Dashboard.
Extensive customization options are available for Weglot’s language switcher, allowing you to tailor it to fit your store’s branding for a super-professional end result. Here’s how to customize it:

Importantly, the language switcher can be repositioned easily without any theme modifications, ensuring that it remains accessible and user-friendly across different pages of your store. For advanced placement, see our section below on Overcoming Common Challenges in Shopify Store Localization.
For developers looking to enhance their Shopify stores with Weglot, customization can be key to creating a tailored multilingual experience. Weglot’s flexibility gives developers the power to create customized multilingual experiences while remaining user-friendly for non-technical users.
Here are some coding tips to consider:
Developers can modify styles such as background color, font size, and padding to match the store’s branding. For example:
select {
background-color: #f0f0f0;
border: 2px solid #007bff;
border-radius: 5px;
padding: 10px;
}
Developers can use JavaScript to trigger specific actions when a language is selected, such as updating other elements on the page or tracking language changes for analytics. For instance, you could implement an event listener:
document.addEventListener('DOMContentLoaded', function() {
var languageSelector = document.querySelector('select[name="language_code"]');
if (languageSelector) {
languageSelector.addEventListener('change', function(event) {
// Custom functionality here
// For example, track language change event
console.log('Language changed to: ' + event.target.value);
});
}
});
One of Weglot’s key features is the automatic creation of language-specific URLs, such as example.com/fr for French versions of your site. A sound URL structure ensures that search engines can index each language version, improving your multilingual SEO efforts.
Weglot helps customers switch languages easily during their shopping experience, whether browsing products or checking out. When a customer switches from an e.g. English product page to its (e.g., Spanish) equivalent, they experience a fluid transition without losing their place in the shopping journey. Such features can impact key metrics like time on site and conversion rates, improving customer satisfaction and ultimately driving global growth.
To give an example, Everyone.org – which used Weglot to create a multilingual website in 12 languages – experienced a 40% increase in total visitors, with French-speaking users converting at nearly double the average sitewide conversion rate.

Multilingual SEO ensures that your products are discoverable by users searching in different languages, driving online traffic. A fundamental aspect of multilingual SEO is having a proper URL structure, and using subdirectories helps search engines identify and rank different language pages.
Hreflang tags play a significant role in this process by informing search engines about the language and regional targeting of your pages. This helps direct users to the most relevant version of your site.
Translated metadata, including title tags and descriptions, further contributes to better search visibility. Weglot automates much of the technical SEO work, automatically creating language-specific URLs and implementing hreflang tags without requiring manual intervention.

Additionally, Weglot’s Visual Editor and language glossary allow store owners to maintain translation consistency.

To go the extra mile with multilingual SEO, Shopify store owners can do the following:
Remember, effective multilingual SEO can lead to increased market opportunities! After implementing Weglot for multilingual optimization, Ron Dorff, a Shopify store, saw an incredible 400% rise in website visits.

Localizing Shopify stores comes with meeting some unique challenges, but Weglot offers effective solutions to ease you through the process.
To change the position of the Weglot language switcher on a Shopify site, you can use one of the following four methods:
Utilize the Switcher Editor to drag and drop the language switcher directly on a live preview of your website. This method requires your site to be live.
Create a custom language switcher in your main menu by linking it to Weglot translations. Navigate to Shopify Admin > Online Store > Navigation, add menu items for each language using the format #Weglot-language (e.g. #Weglot-en for English). You can also create a drop-down menu for languages.
Insert the following code snippet into your Theme.liquid file at the desired location:
<div id="weglot_here"></div>
This code will place the language switcher where you place the code, addressing common placement limitations discussed in community forums.
Manually integrate the switcher by modifying your Weglot initialization code in weglot_switchers.liquid. Include the Switchers option and specify the target CSS selector for where you want the switcher to appear:
Weglot.initialize({
api_key: "YOUR_API_KEY",
switchers: [{
location: { target: ".header-nav" }
}]
});
Make sure to replace .header-nav with your desired element’s CSS selector.
You’ll also gain the following localization benefits from using Weglot:
| Feature | Weglot | Shopify |
|---|---|---|
| Translation Method | Automatic translations via multiple engines (DeepL, Google, etc.) with full manual editing. | Manual translations; can automate via integration with translation tools. |
| Content Coverage | Translates 100% of the website, including navigation, headers, footers, and meta information. | Requires additional apps for full translation coverage (e.g. navigation). |
| SEO Optimization | Server-side translations with automatic hreflang tags and unique URLs for each language. | Creates separate URLs for each language, also includes hreflang tags for SEO. |
| Customization Options | Highly customizable language switcher with visual editor and CSS options. | Basic language selector that can be customized using Liquid code. |
| User Experience | Visual Editor allows real-time edits and in-context translation adjustments. | Automatic display of translated content based on user-selected language or URL. |
| Ease of Use | User-friendly setup with no coding required; handles technical aspects of translation. | Requires some setup in Shopify admin; users need third-party apps for more complex needs. |
Shopify provides users with the basic tools needed to translate their stores into multiple languages, but limitations exist.
In contrast, Weglot offers a comprehensive translation solution and meets Shopify’s limitations head-on. As a result, the platform is a more suitable option for users who want a hands-off approach to multilingual content management.
As we’ve seen, Weglot offers unique advantages for Shopify stores, making it the ideal solution for overcoming language barriers online. With Weglot’s language switcher, you gain added customizations to improve UX, while the Visual Editor allows for in-context translations, enabling you to refine content wherever needed. You can even order professional translations directly from the dashboard for greater accuracy.
Weglot integrates with popular Shopify apps, including smart search tools and image galleries, ensuring your store remains fully functional in multiple languages. Additionally, our platform creates language-specific subdomains or subdirectories, significantly boosting your SEO efforts.
Best of all, Weglot is compatible with all content management systems, meaning if you move away from Shopify, you don’t need to lose the benefits of Weglot.
Start your 14-day free trial with Weglot today and enjoy a multi-language site in minutes!
Language switchers sometimes disappear after a theme update, app install, or layout tweak. These issues usually trace back to your theme settings or switcher placement. Let’s troubleshoot the four most common roadblocks.
Seeing two switchers usually means both Shopify’s native switcher and your app’s version (such as Weglot) are active at the same time. You might also have more than one Weglot switcher configured.
Start by opening Shopify Admin > Online Store > Themes > Edit theme. Check the header and footer for Shopify's native language selector, disable it if you're using Weglot, and save your changes. The exact setting depends on your theme. Additionally, keep the country/region selector enabled if customers need it to choose their market.
If both switchers belong to Weglot, open Weglot Dashboard > Settings > Language Switcher > Switcher Editor. Check which switchers are configured and whether they're set to appear at the same screen sizes. Weglot supports separate desktop and mobile switchers, so make sure they're not unintentionally appearing together.
If you've added language links to your Shopify navigation, check whether they're appearing alongside Weglot's regular switcher. Remove any redundant menu items if you don't need both.
For further guidance on custom switcher placement and initialization, see the official Weglot Shopify language switcher documentation.
If your language switcher disappears after updating your Shopify theme, it doesn't necessarily mean your translations are gone. The issue may be with the switcher's settings or placement in the updated theme.
Test one of your store's translated URLs, such as yourstore.com/fr/, if your setup uses language subdirectories. If the page displays translated content but the switcher is missing, the problem may be with the switcher's display rather than the translations themselves.
If you're using Shopify's built-in switcher, double-check that your extra languages are still published under Settings > Languages. If they aren’t marked as Published, they won’t show up anywhere.
If you're using Weglot:
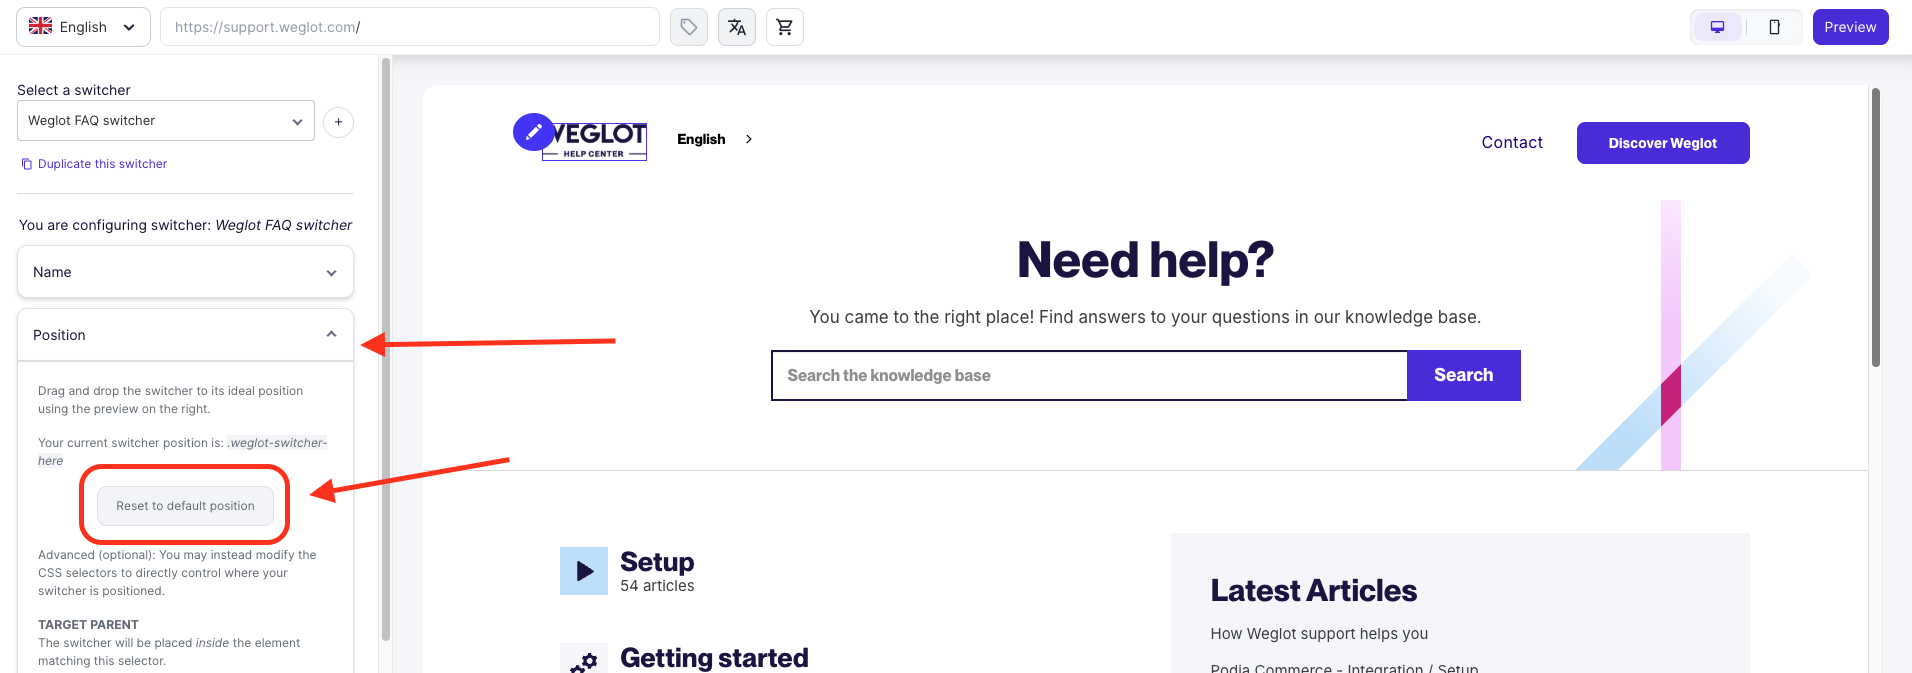
If you've manually added Weglot's switcher to your theme code, check whether the update preserved your custom placement. For example, if you previously used <div id="weglot_here"></div>, confirm that it's still present in the intended location. If it was removed, restore it from your previous theme version after checking that the placement is compatible with the updated layout.
Also, check your storefront on both desktop and mobile. If the switcher works on desktop but not mobile, its screen-size visibility settings or your theme's mobile layout may be responsible. This is what we’re covering next.
If your Shopify language switcher appears on desktop but disappears on mobile, it may be hidden by your theme's mobile layout or configured to display only on larger screens.
If you're using Shopify's built-in switcher, open Online Store > Themes > Edit theme and select the mobile preview. Check whether the language selector appears in the footer, header, or mobile menu, depending on your theme. If it's missing, check that the relevant language selector setting is enabled. Some themes may require additional customization to display it in your preferred mobile location.
If you're using Weglot:
If your mobile header doesn't have enough space, you can also add language links to your mobile navigation menu. Go to Shopify Admin > Content > Menus, select the menu used by your mobile navigation, and add a menu item for each language using Weglot's link format, such as #Weglot-en for English or #Weglot-fr for French. You can also group these links under a Languages dropdown if your theme supports it.
If the switcher is still missing, check whether custom CSS hides it on smaller screens or whether it's placed inside a desktop-only navigation element. Moving it to a visible, consistent location may resolve the issue.
If your Weglot language switcher only appears after refreshing the page, the issue may be related to how your Shopify theme loads content or where the switcher is positioned.
Try these fixes:
Finally, test your storefront in a private browser window, starting from the homepage and navigating to different product and collection pages. If the issue persists, contact Weglot Support with your store URL, theme name, and the steps needed to reproduce it.


Trusted by 110,000+ global brands


0 visits from translated pages in the last 90 days.


Reach new audiences in minutes without sacrificing your team’s time. Anyone can install it.