Try Weglot for free


Creating a multilingual website means giving international visitors a clear path to the content they came for. A language dropdown in your Webflow navbar does exactly that. We’ll walk you through three ways to build one: Webflow’s Locales list element, a custom-coded JavaScript toggle, and an automated setup with Weglot. For each, you’ll get the exact click-path, how they compare, and which fits the way you already work.
In summary:
Before you pick a method, it helps to know what each one gives you.
Webflow’s Locales list is best for teams already using Webflow Localization and are comfortably set up. If you haven’t yet, setup effort is medium. It requires a paid Webflow plan with Localization enabled, and it isn’t compatible with Webflow Ecommerce.
A custom-coded JavaScript toggle suits multi-project or subdomain setups. Setup effort is low to medium. It’s flexible, but you’ll have to maintain the code.
Weglot is best for teams wanting a hands-off high-quality translation, switcher, and SEO setup in one. Setup effort is low. It works with any Webflow plan (including Ecommerce) and adds hreflang tags automatically.
In the Webflow Designer, go to Settings > Localization and click Enable Localization. Choose your primary locale, then click Add locale for each language you want to support.
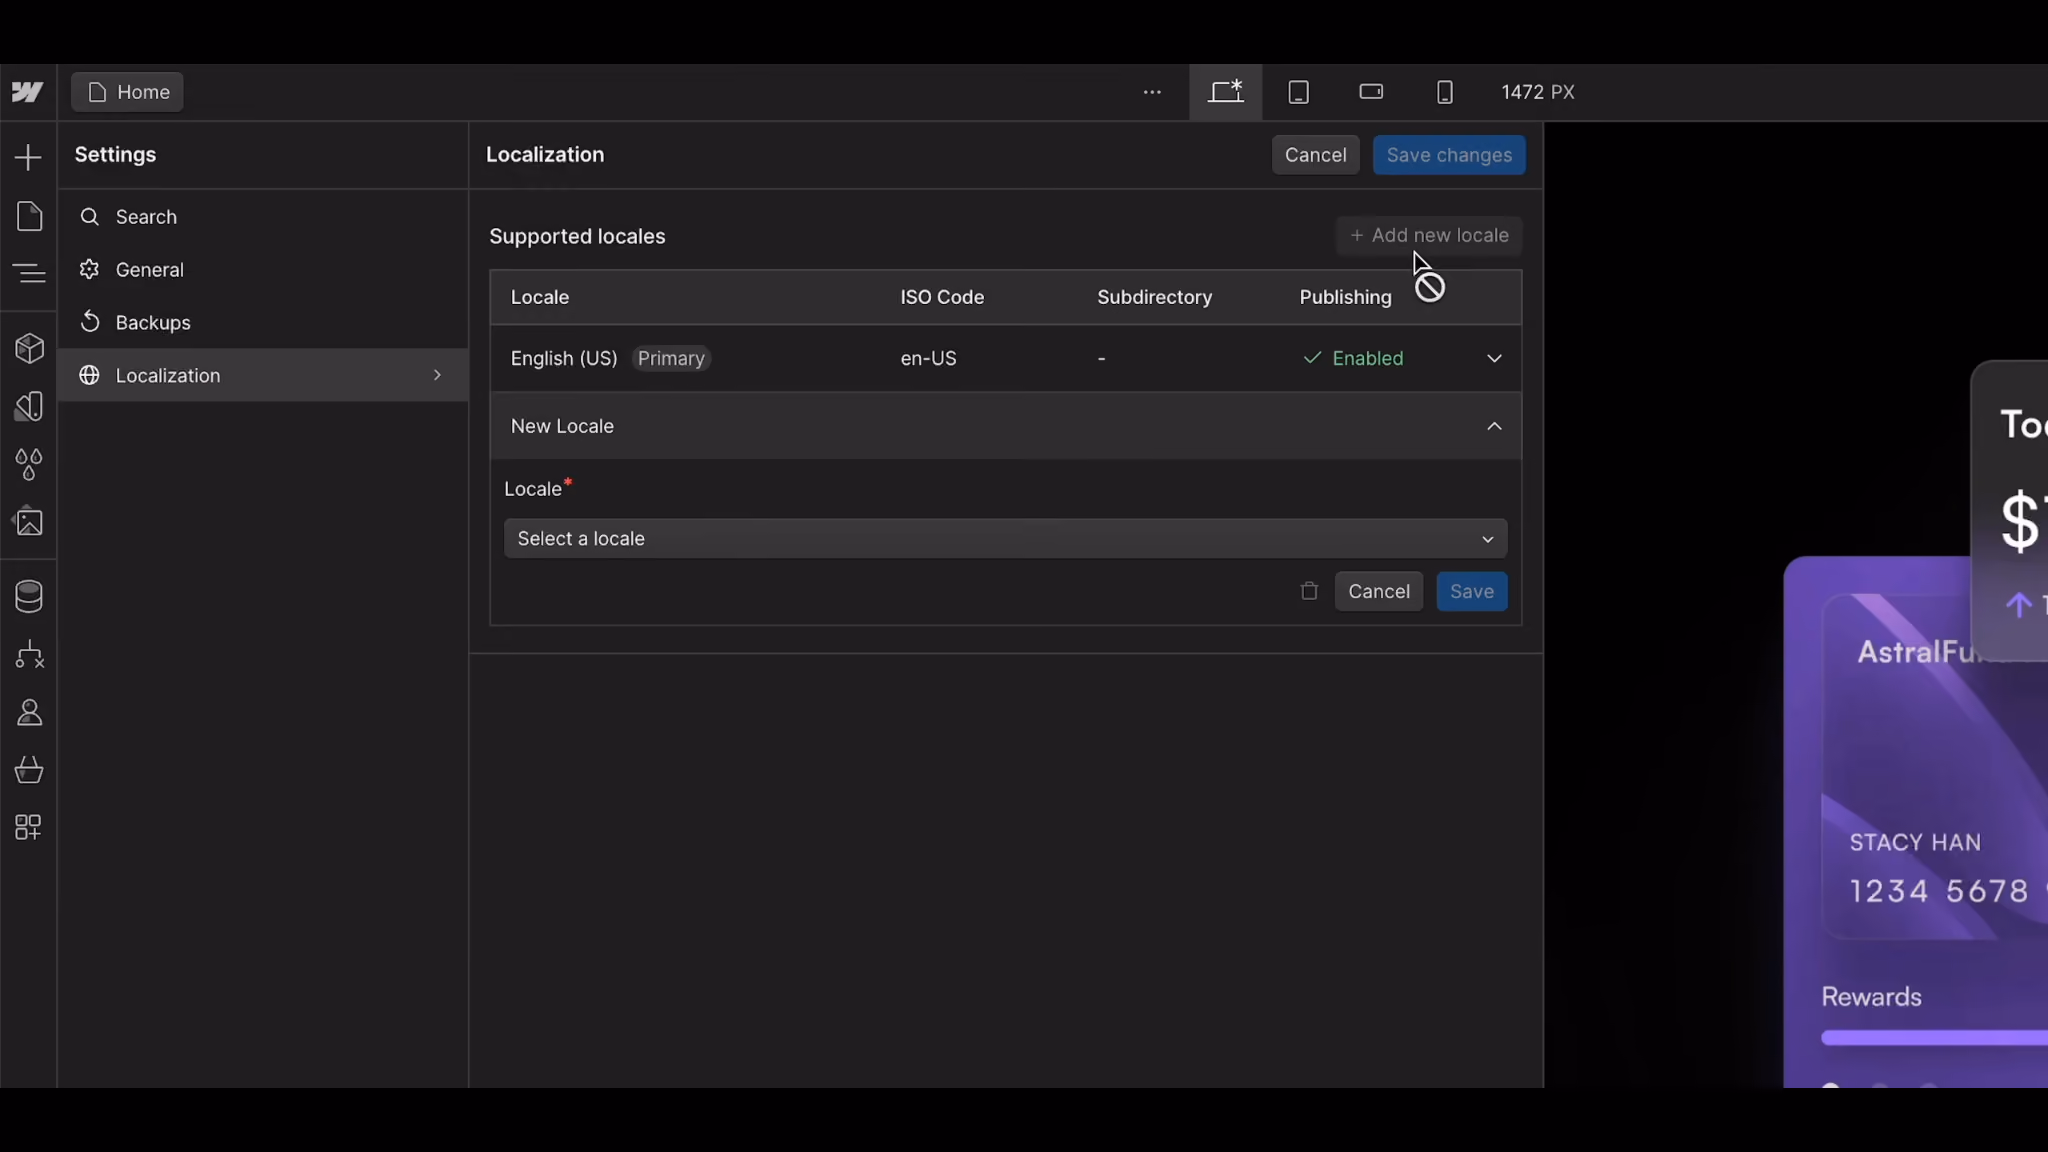
For each new locale, configure its display name and subdirectory, and toggle on Enable publishing to this subdirectory. Locales without publishing enabled won’t appear in your switcher later, so don’t skip this step.
Open the Add panel and scroll to Advanced. Drag a Dropdown element into your navbar. Open the Navigator, expand the Dropdown to reveal its child elements, and delete the three placeholder links (Link 1, Link 2, Link 3). Your locales will appear here after we configure it in the next step.
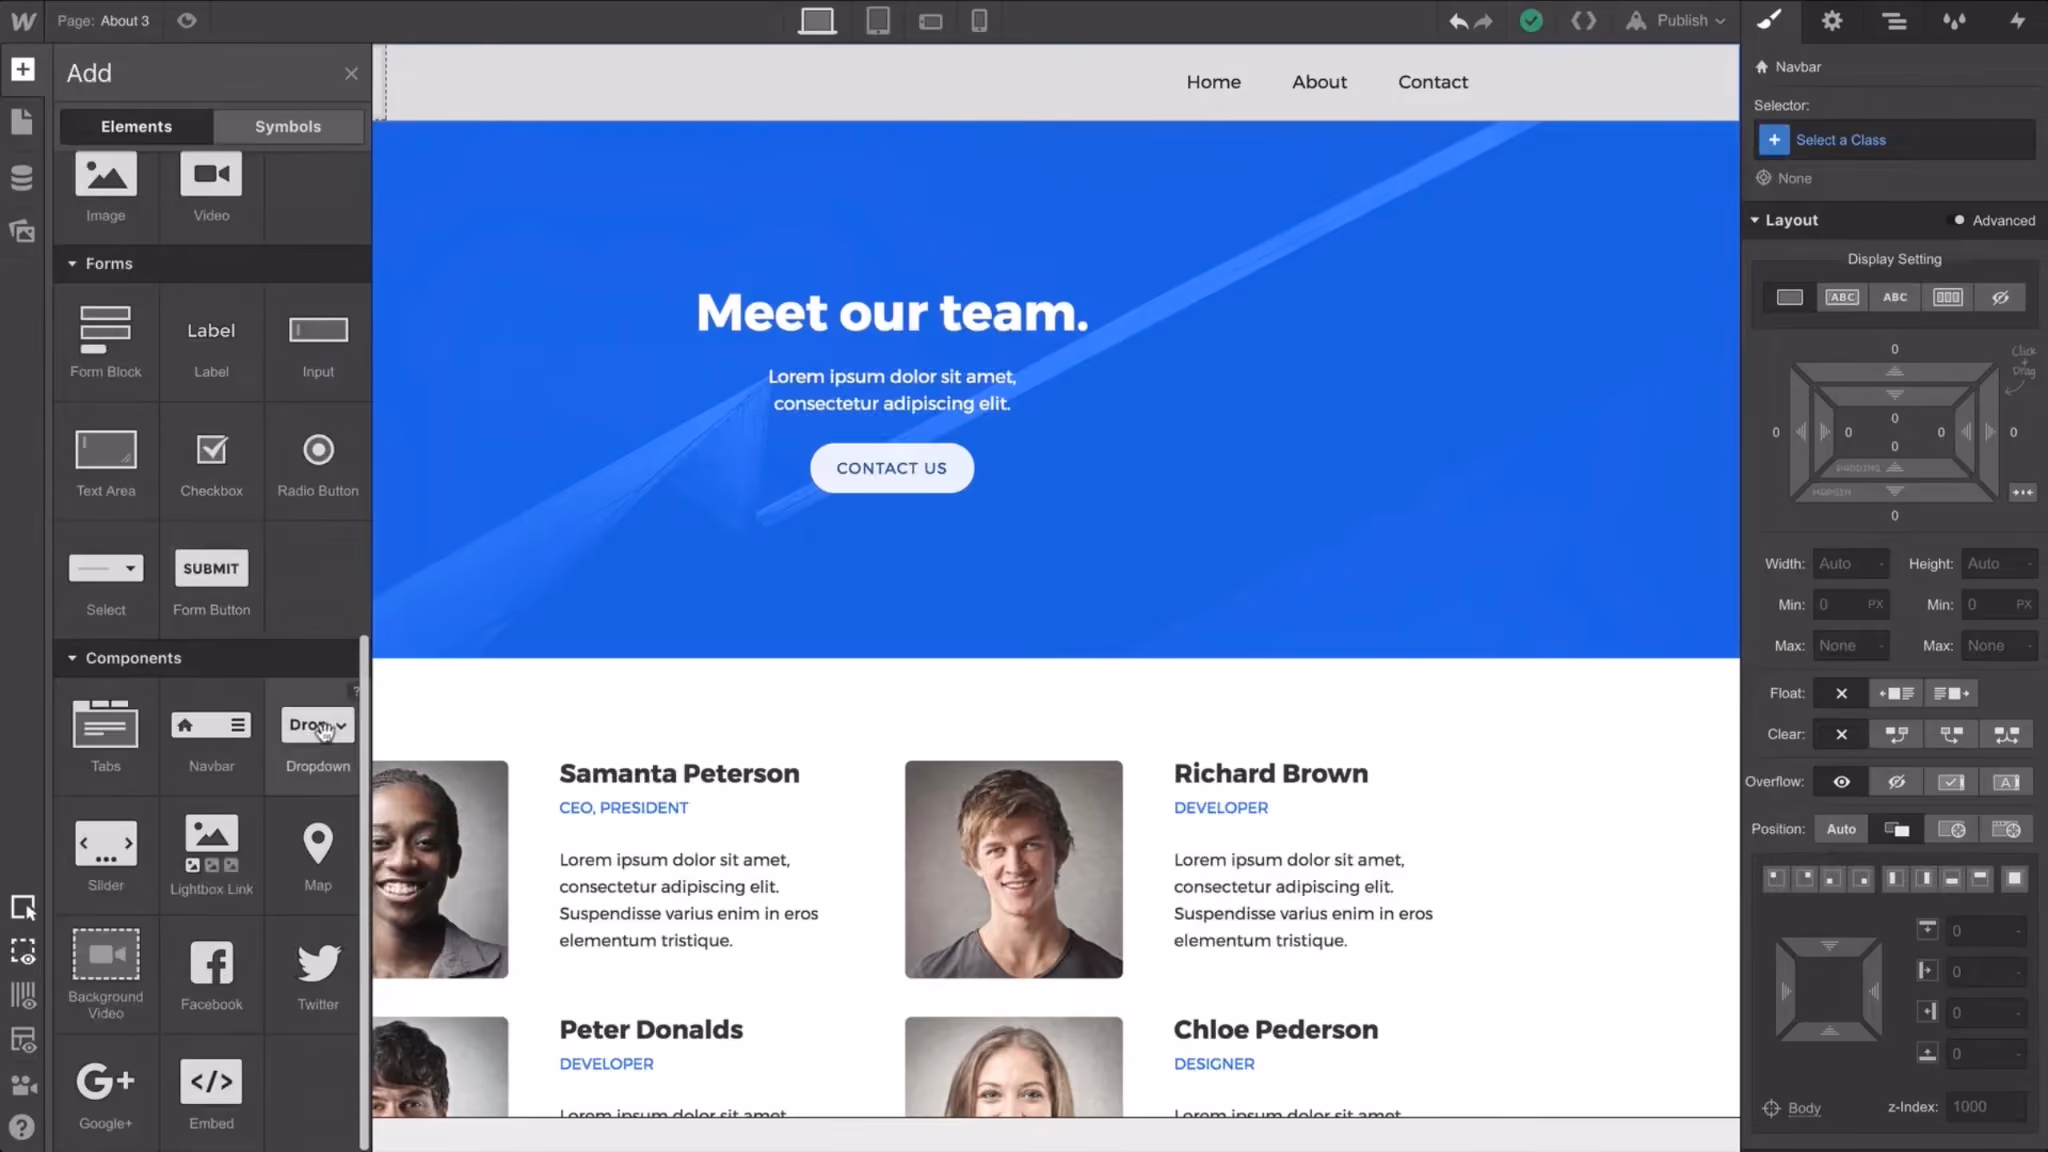
From Add panel > Advanced, drag a Locales list element into the Dropdown’s Navigation element. The Locales list works like a Collection list: it automatically generates one item per published locale, so you don’t create a separate link for each language.
Click the Link element inside a locale item, then open the Element settings panel and click the purple dot icon next to the Text field. Under Locales List Item, pick how each option should be labeled: Locale (en-US), Language (en), Country (US), or Display name (English (United States)).
To make the dropdown toggle show the active locale, select the Text Block inside the Dropdown Toggle, click the purple dot next to Text, and under Current Locale pick the same label format.
If you’ve uploaded display images for each locale, add an Image element inside the Locale element, click the purple dot next to Image, and under Locales List Item, choose Locale Image. Repeat inside the Dropdown Toggle using Current Locale > Locale Image to show a flag on the active locale.
For mobile, select the Dropdown and set Menu > Open on Click (not hover, since hover doesn’t work on touchscreens). Confirm that touch targets are at least 44x44 pixels so the switcher is comfortably tappable.
Use this method when your language versions live in separate Webflow projects or on different subdomains (for example, example.com and es.example.com), where the native Locales list doesn’t fit. You’ll definitely need some coding expertise in your back pocket, or a developer on the team that can do this for you.
Add a button or link to your navbar and give it a class like language-toggle. Then paste a short script into Page Settings > Custom Code > Before </body> tag that redirects the visitor to the equivalent page on your alternate domain, preserving the path so they don’t land on the homepage of the other language.
For three or more languages, expand this approach with a data attribute on each button (for example, data-language=”fr”) and a lookup object that maps each code to its domain.
Use this method if you don’t want to deal with code and want the language switcher, translations, hreflang tags, and SEO-friendly URLs handled in a single setup. It’s particularly useful on Webflow Ecommerce stores, which Webflow Localization doesn’t support.
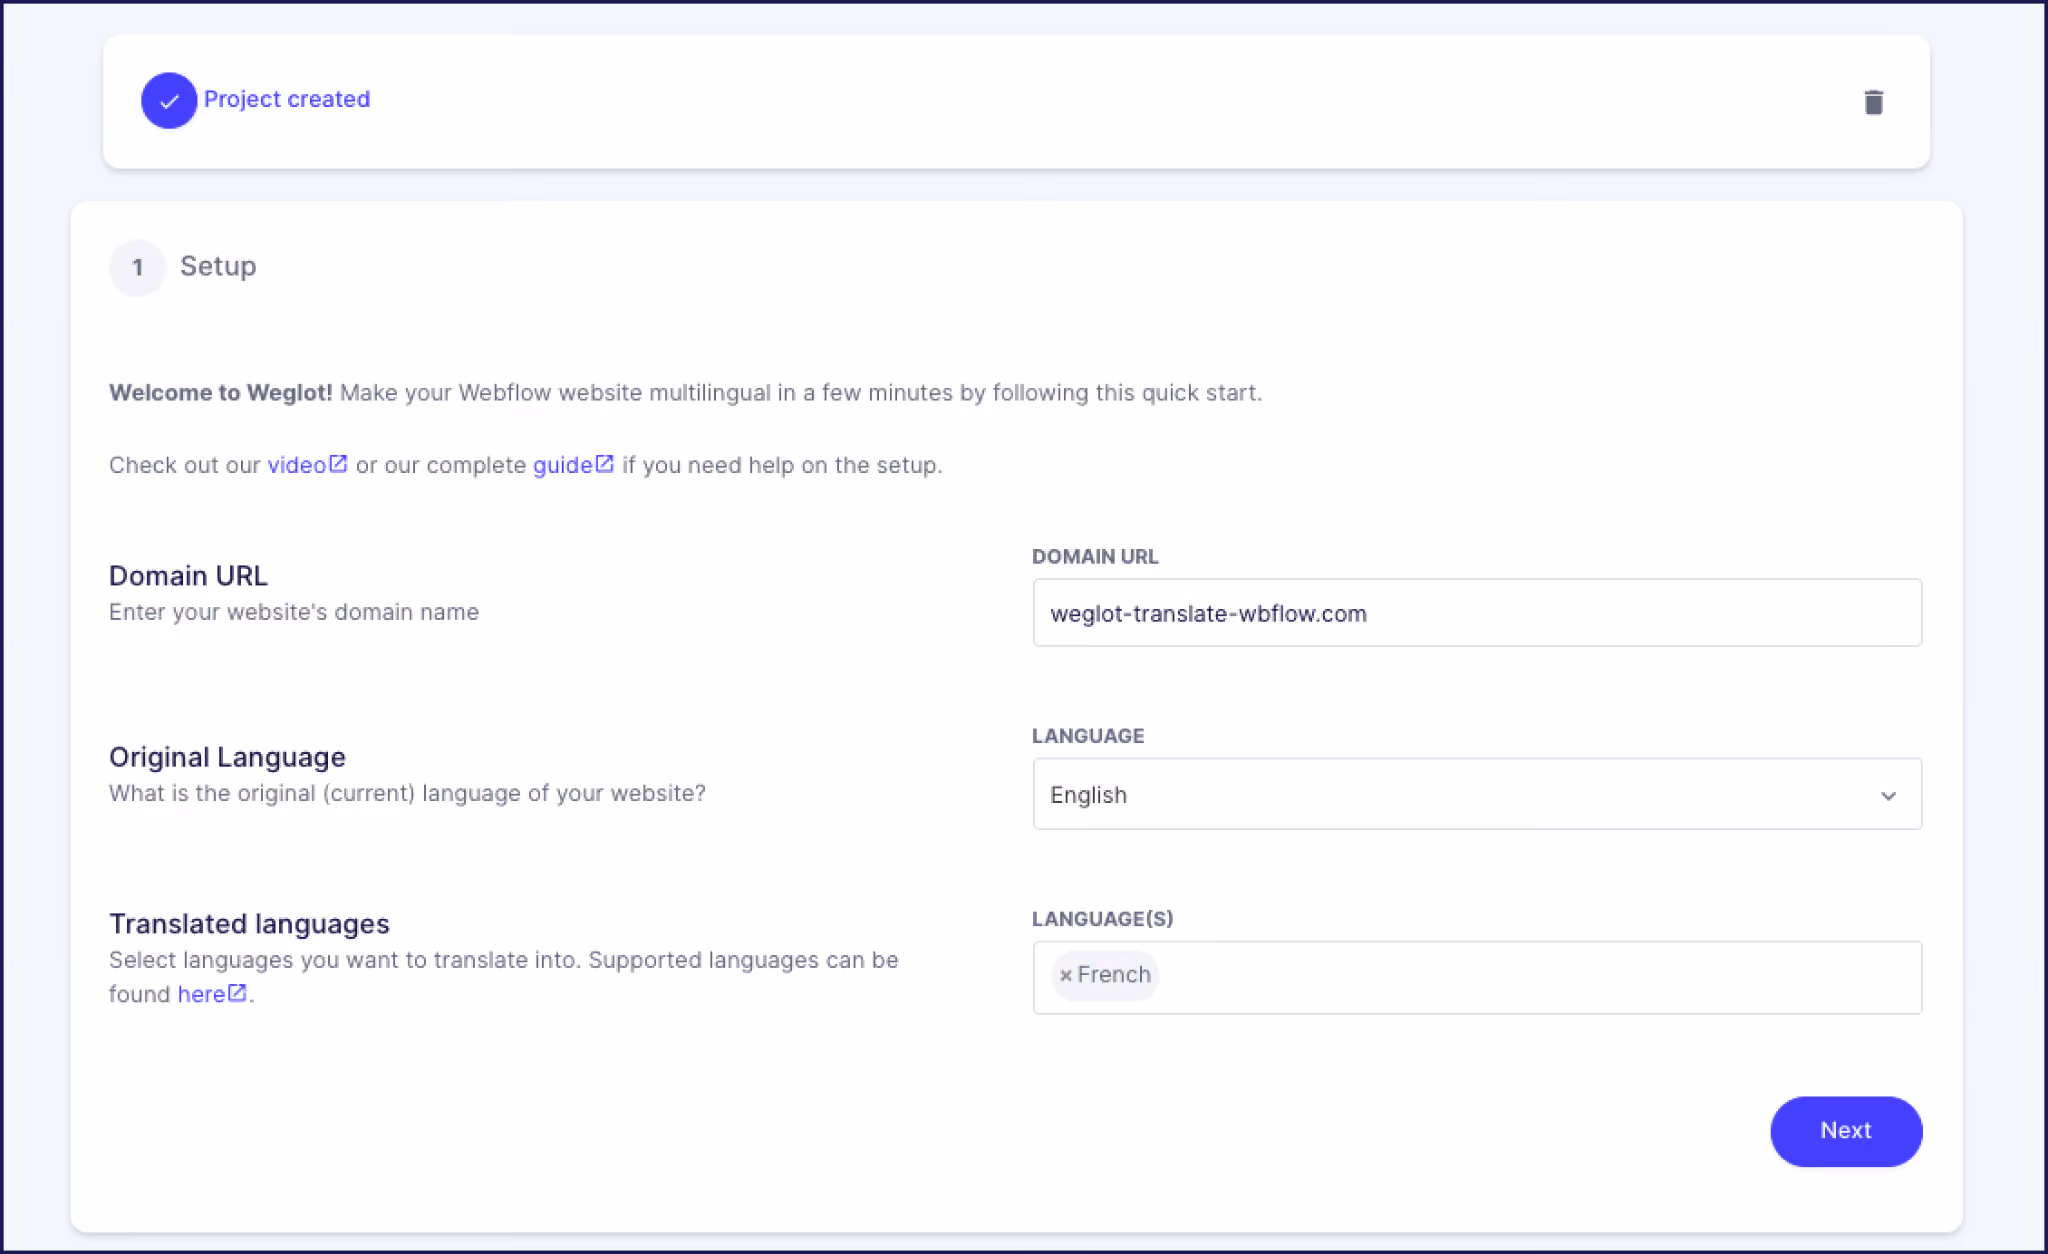
Start by creating a Weglot account and add your Webflow site domain.
Select your source and target languages, then copy the Weglot snippet and paste it into Webflow Site Settings > Custom Code > Head Code. Publish your site, and a language switcher appears automatically, and that’s it! Your content is translated and displayed under SEO-friendly subdirectories or subdomains, with hreflang tags and translated metadata handled for you.
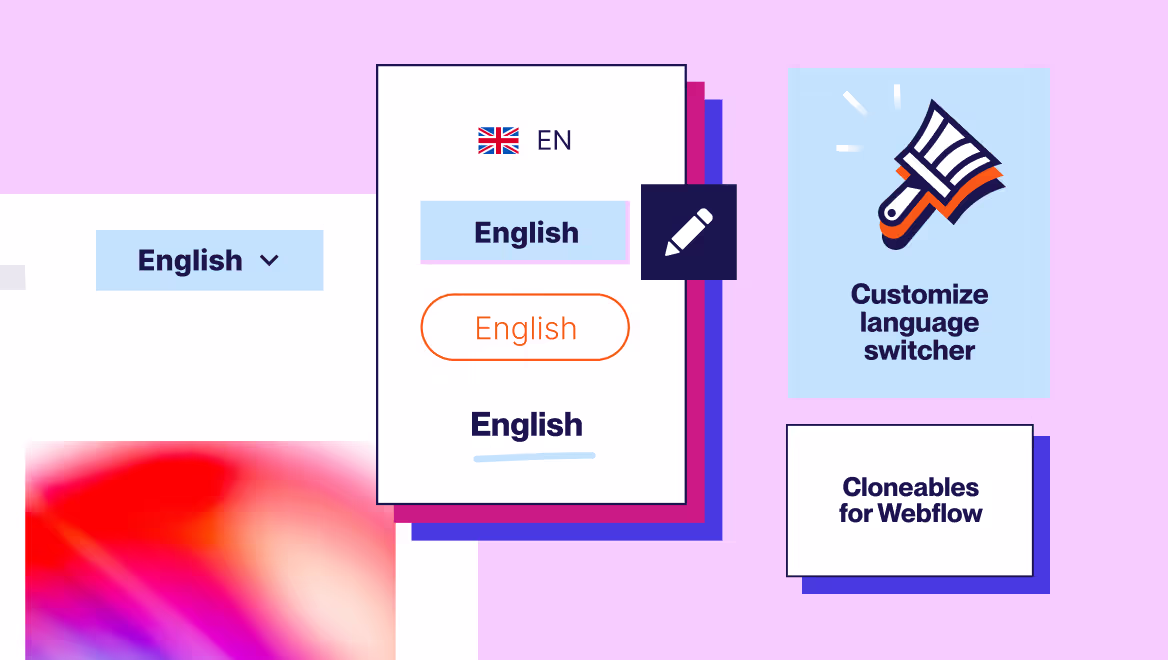
You can edit the switcher visually from the Weglot Dashboard: drag it anywhere on the page, toggle flags on or off, and choose whether to display language names, language codes, or country codes.
For Webflow-specific designs, the Weglot UI Kit includes 20+ clonable language switchers ready to drop into the Designer.
Teams on Webflow typically pick Weglot for a few reasons. Automatic content detection means new pages are translated without triggering anything manually. Translations live in a separate dashboard, so translators don’t need Webflow Workspace seats. It works with Webflow Ecommerce, which Webflow Localization doesn’t. And multilingual SEO is built in across all plans.
If you’re weighing the two most common paths, here’s how they differ on the points that tend to matter most:
A language dropdown is a small piece of your navbar, but it’s the most visible signal that your site is built for more than one audience. Whether you build it with Webflow’s Locales list, script it yourself, or automate it with Weglot, the goal is the same: get visitors into the right language fast, without friction.
If you want the switcher, the translations, and the multilingual SEO handled in one setup (including Webflow Ecommerce), try Weglot free for 14 days on your Webflow site.

We’ll get your first languages live. You decide how far you want to go. Try Weglot for free today.
Trusted by 70,000+ global brands


Weglot is tested and trusted by brands worldwide since 2016. Join them today.


The best way to understand the power of Weglot is to see it for yourself. Test it for free and without any engagement.
A demo website is available in your dashboard if you’re not ready to connect your website yet.


Open Add panel > Advanced and drag the Dropdown element into your navbar. For a language dropdown specifically, drop a Locales list element inside the Dropdown’s Navigation element to auto-populate language options. Configure the toggle and list design from the Style panel.
If you already use Webflow Localization, the native Locales list element is the no-code option: drag it into a Dropdown and Webflow generates the items from your published locales. If you don’t, an automated tool like Weglot adds a fully functional language switcher to any Webflow site (including Ecommerce) with a single snippet.
With Webflow Localization, hreflang tags are generated when you publish locales under subdirectories. If you’re using a custom multi-project or subdomain setup, you’ll add hreflang tags manually via Page Settings > Custom Code > Head Code on each page. Translation tools like Weglot generate and inject hreflang tags automatically across all your translated pages.
Yes. Webflow’s Style panel controls typography, spacing, colors, and hover states on the Dropdown, Locales list items, and the Dropdown Toggle. You can also clone pre-built designs from the Weglot UI Kit for a head-start on professional styling without starting from scratch.
.avif)